in this guide
You can claim some payments up to 13 weeks before your circumstances will change.
Read more about Centrelink payments you can claim online.
The screenshots in this guide are from a computer. The page layout will look different if you’re using a mobile device.
Step 1: get started
Sign in to myGov or the myGov app and select Centrelink.
Select MENU from your homepage.
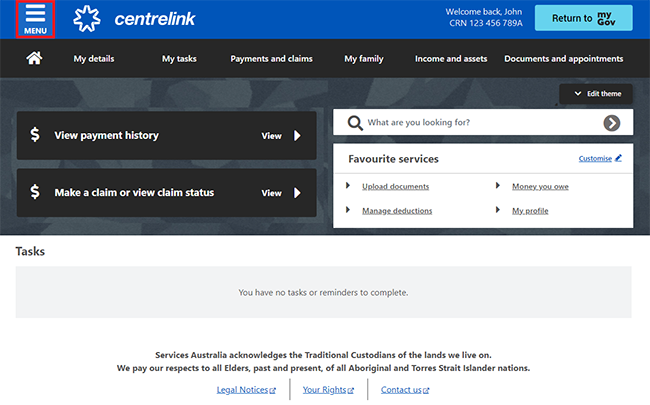
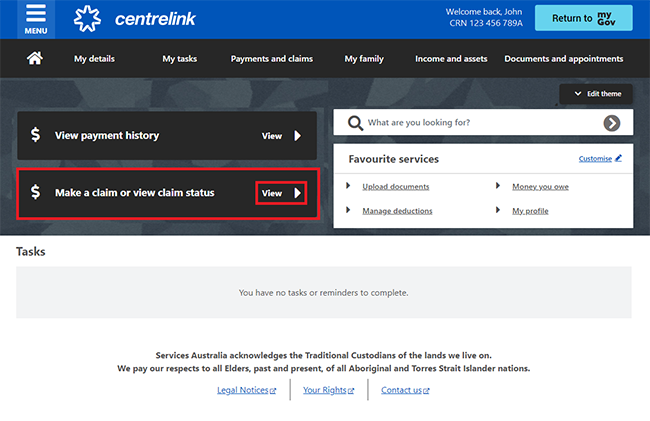
Select Payments and claims, then Claims, and Make a claim.
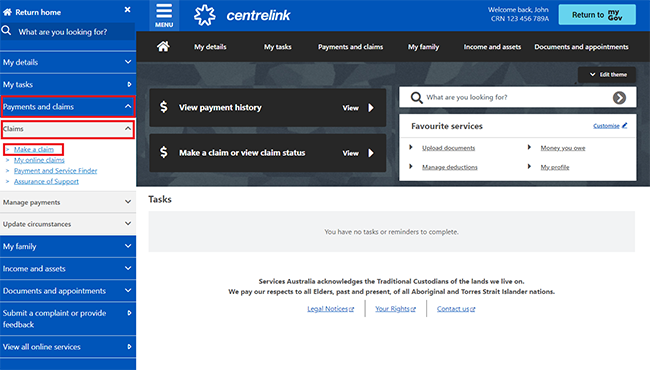
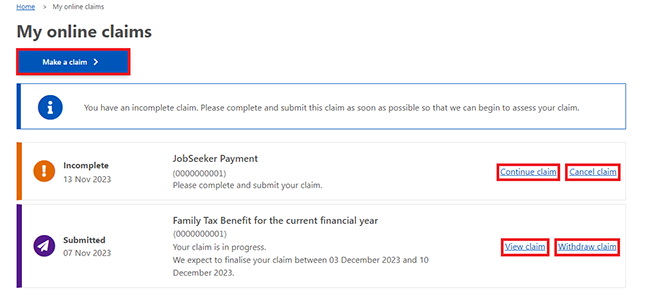
On the My online claims page, select Make a claim to begin a new claim.
If you’re not making a new claim, you can select any of the following:
- Continue claim to continue a claim you’ve started
- Cancel claim to cancel a claim and start again
- View claim to see the details of a claim you’ve submitted
- Withdraw claim to withdraw a claim you’ve submitted.
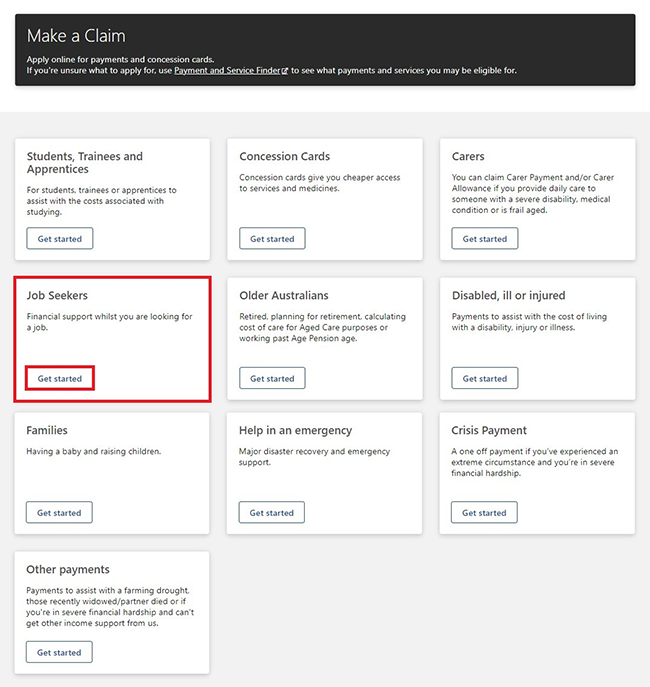
To make a claim, select Get started from the category that best describes your circumstances.
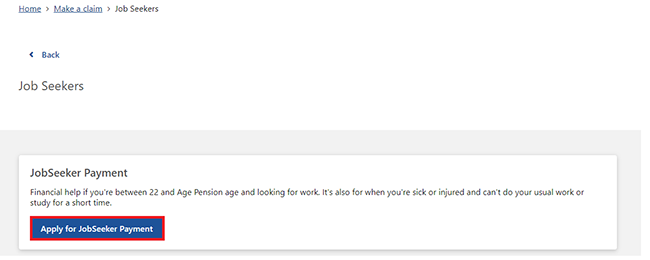
In this example, we’ll show how to claim a payment if you’re unemployed. Select Get started in the Job Seekers category.
Select Apply for JobSeeker payment.
Step 2: answer pre-claim questions and check eligibility
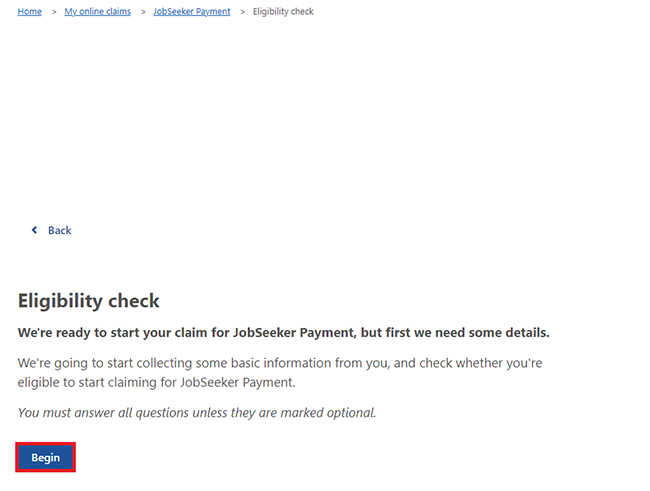
We’ll ask you some questions to check if you’re eligible for a payment from the category you’ve chosen. This helps you decide if you should claim this type of payment.
To check your eligibility, select Begin.
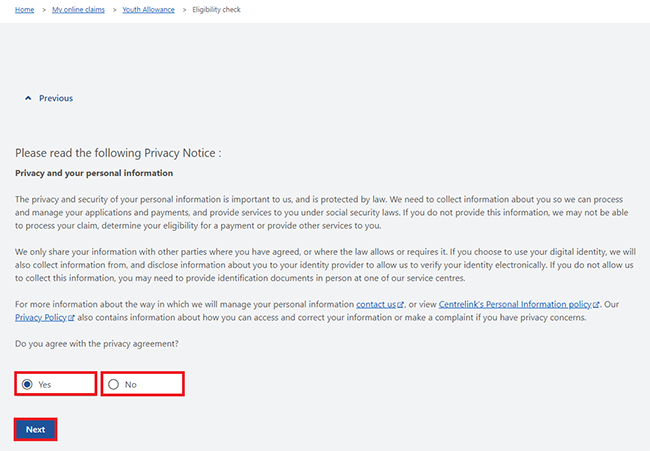
Read the Privacy Notice about how Services Australia uses your personal information.
Select Yes to agree with the privacy agreement, then Next to continue.
If you select No, you won’t be able to continue your claim. If you still want to claim a payment, you’ll need to contact us to discuss your options.
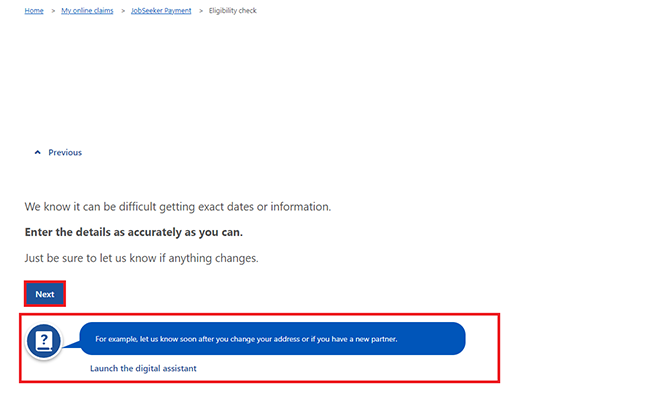
To go to the first question, select Next.
Select Launch the digital assistant to use our digital assistant for help.
Select the option that best describes your current circumstances, then select Next.
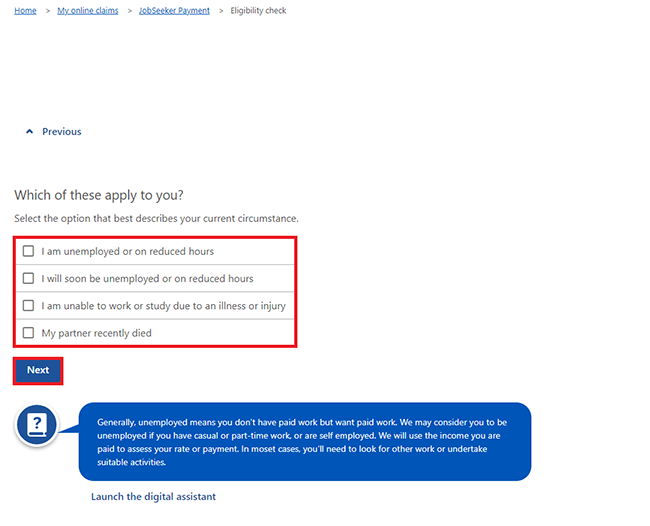
We’ll ask you if this is an early claim if you selected either of these:
- I will soon be unemployed or on reduced hours
- I am unemployed or on reduced hours.
Select either Yes or No to confirm whether it’s an early claim or not.
If you select Yes, you need to tell us the date your circumstances will change. Select the calendar icon to tell us the date.
Then select Next.
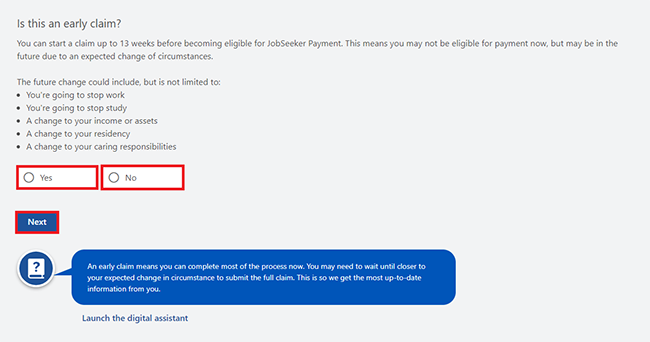
Answer all the questions by either:
- selecting Yes or No
- entering the information we ask for.
After you answer each question, select Next to move to the next one.

When you’ve answered all the questions, select Continue to save your changes and proceed.
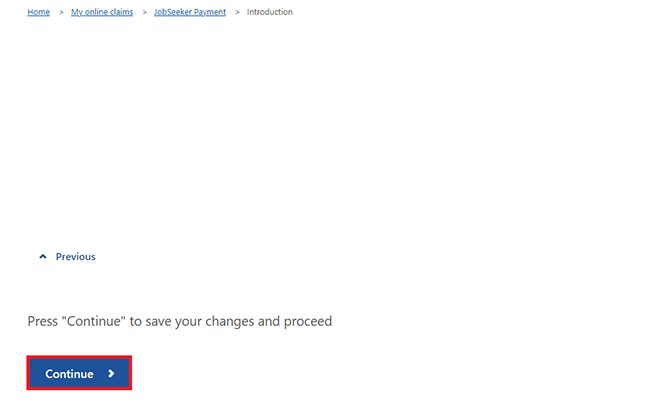
Based on your answers, we’ll let you know if you may be eligible. If you don’t meet eligibility requirements, we’ll reject your claim.
Step 3: start your claim and answer questions
To start your claim, select Begin.
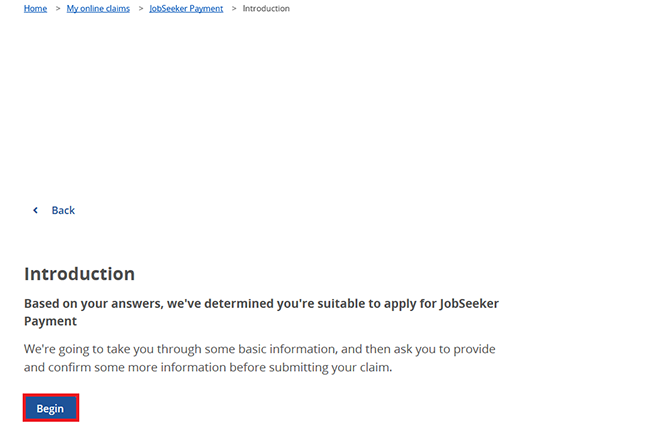
If you’re completing your claim early, answer the questions based on the date you told us your circumstances will change. Then select Next.

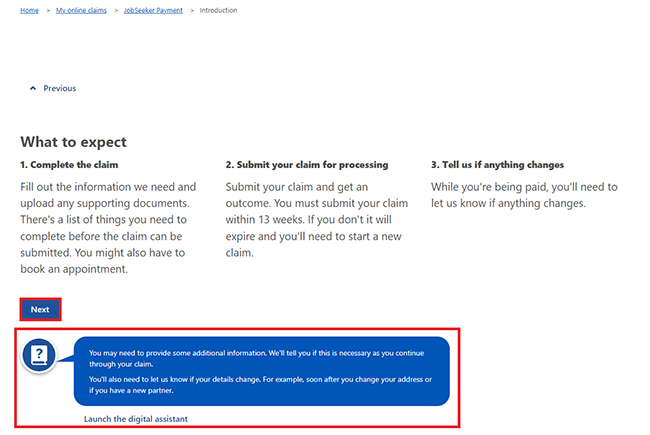
Read about what to expect during the claim process, then select Next.
If you need help, select Launch the digital assistant.
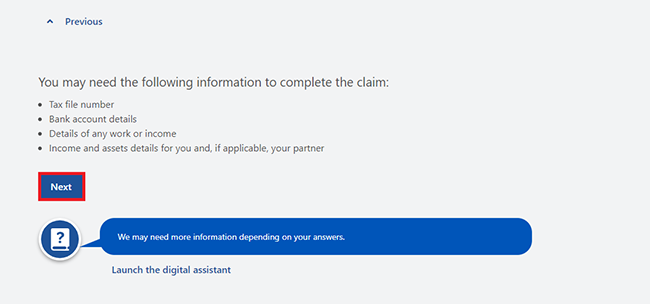
Get the information you need to complete your claim, then select Next.
Select Continue to save your changes and proceed.
You’ll have some steps to complete in your claim. These will be different depending on what payment or service you’re claiming.
If you’re eligible to apply for JobSeeker Payment, you’ll have 5 steps:
- Your personal details
- Your circumstances
- Your financial details
- Review and confirm
- Next steps.
Each step will ask you to answer questions.
Answer all the questions, then select Next.
When you’re completing your claim, you can select any of these:
- Edit to make changes to an answer or information
- the dropdown menu to choose different answers
- Next to confirm information
- Add to enter your financial details if required
- Continue to save your progress and continue to the next step.
Select Start when you’re ready to complete Step 1.
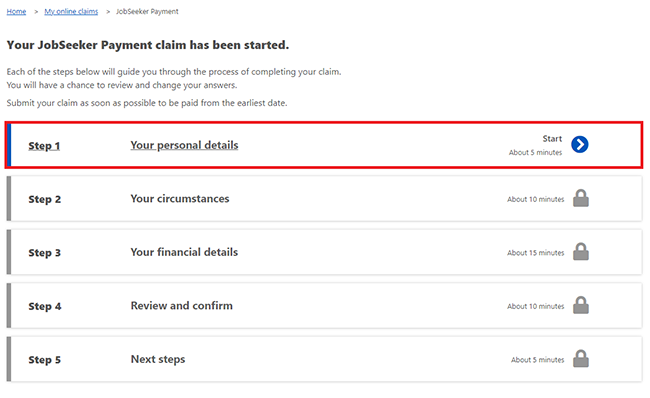
Select Begin to update or confirm your personal details.
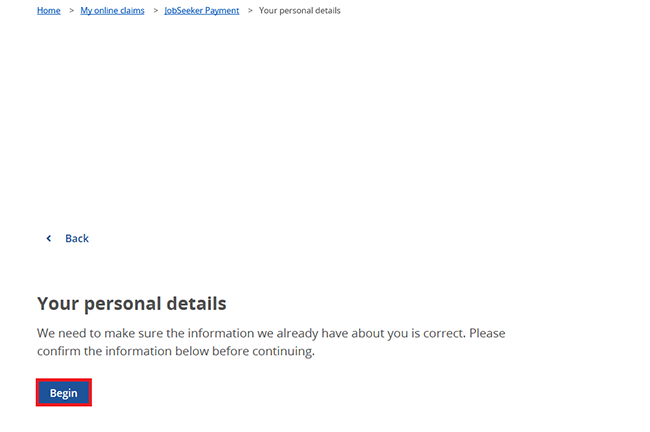
Update or confirm your personal details, then select Continue to save your changes and go back to your claim page.
Select Start when you’re ready to complete Step 2.
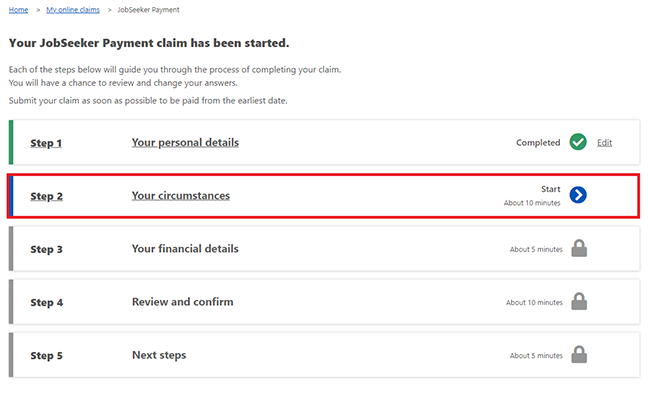
Select Begin to tell us about your circumstances.
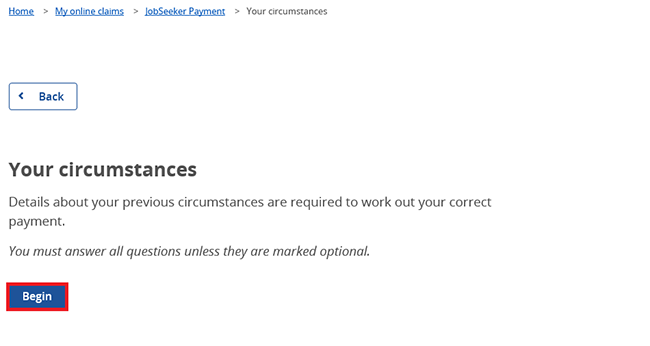
Answer the questions about your circumstances, then select Continue to save your changes and go back to your claim page.
Select Start when you’re ready to complete Step 3.
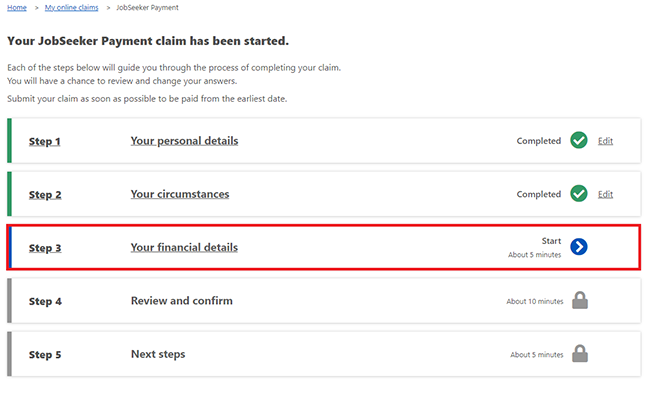
Select Begin to update or confirm your financial details.
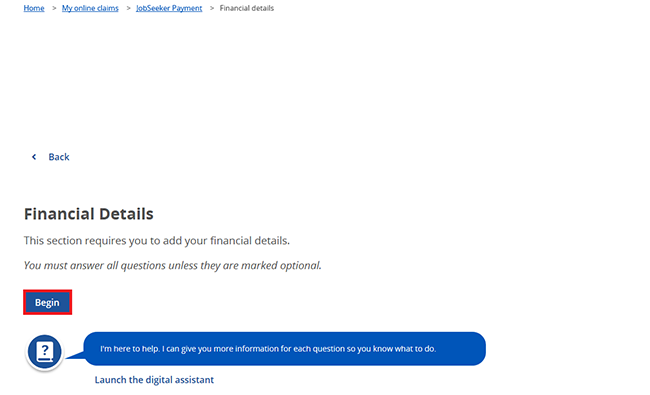
Update or confirm your financial details, then select Continue to save your changes and go back to your claim page.
Step 4: review and confirm your claim
Select Start when you’re ready to review and confirm your claim.
If you started your claim early, go to Step 5 for instructions on reviewing your claim. Your claim is early if you started it more than 14 days before your circumstances will change.
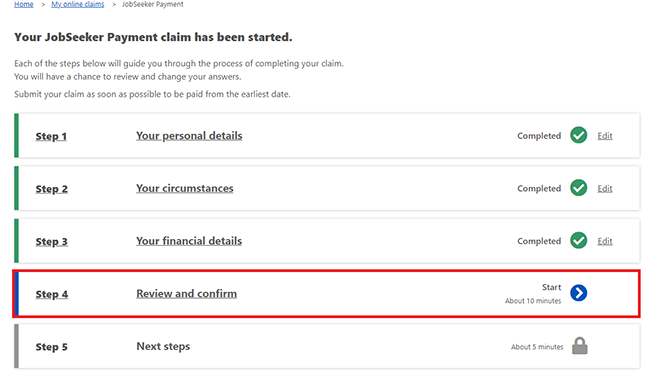
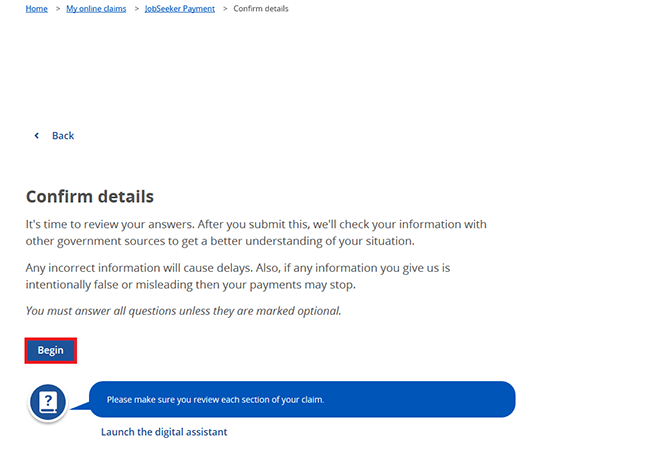
Select Begin to review the details you gave us.
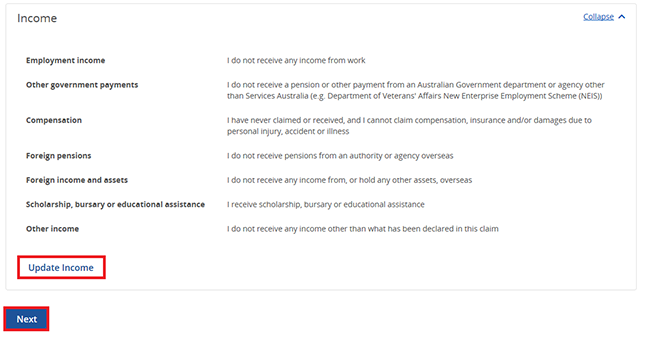
We’ll give you a summary of your claim. Review each section to check your details are correct. If you need to make changes, select the relevant Update button. For example, select Update Income, to change your income details.
If all the details are correct, select Next to read your obligations and terms of the claim.
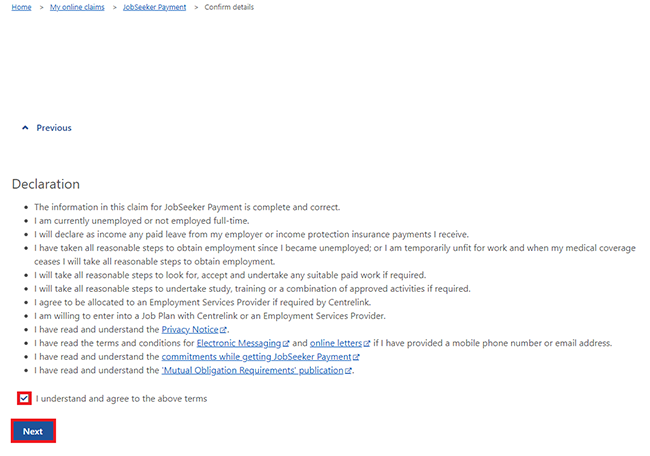
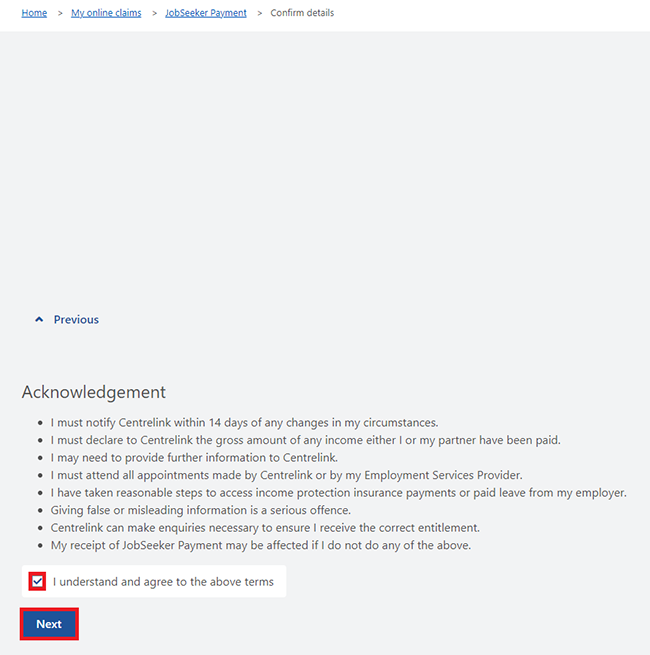
Read your obligations and the terms of the claim. You’ll need to agree to both before you can submit your claim.
If you understand and agree with your obligations in the Declaration, select I understand and agree to the above terms. Then select Next.
If you understand and agree with the terms in the Acknowledgement, select I understand and agree to the above terms. Then select Next.
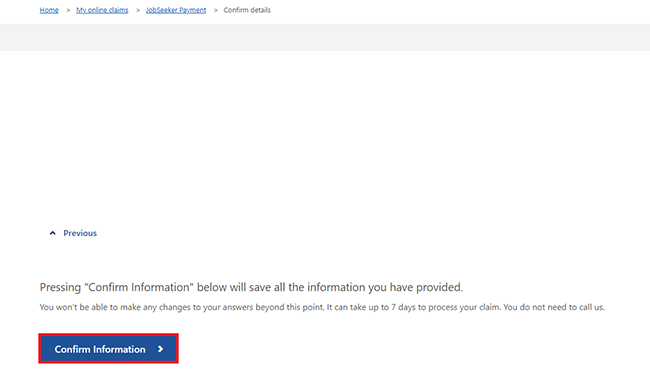
Select Confirm Information to save all the information you gave us and go back to your claim page. You won’t be able to make any changes to your answers after this point. Go to Step 6 to complete extra tasks.
Step 5: review your early claim
If you started your claim more than 14 days before the date your circumstances will change, your claim is early.
If you didn’t make an early claim, go to Step 6 to complete the extra tasks.
If you need to make changes, select the relevant Update button. For example, select Update Eligibility to change your expected change of circumstance details.
You can change your details at any time before submitting your claim.
If the details are correct, select Next.
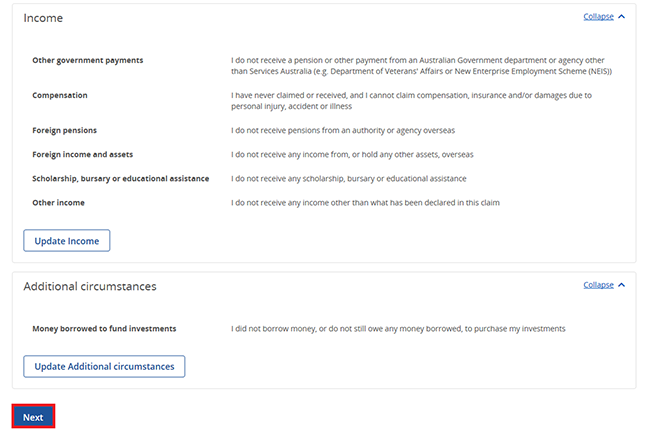
Then select Continue.
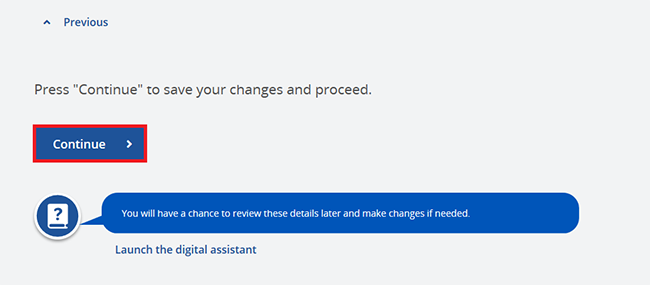
Select Begin to move to the next step.

Read what you need to do next to submit your claim. Then select Next.
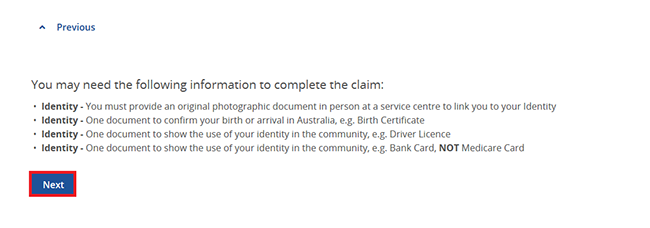
Read what information about your identity you may need to give us to submit your claim. Then select Next.
We’ll send you an SMS or email when you need to complete your claim. We’ll send it 14 days before the date you told us your circumstances will change. We’ll use the contact details you gave us.
You’ll be able to continue with your claim when it appears as a task in your Centrelink online account.
Select Save and wait for notification.

We’ll give you a Claim ID number and the date you can submit your claim.
Follow this online guide if you need help when you come back to submit your claim.
Select Home to go back to your homepage and go to Step 8 to sign out.

Step 6: complete extra tasks
Before you submit your claim you may need to complete some extra tasks.
Select Start when you’re ready to do the Next steps and submit your claim.
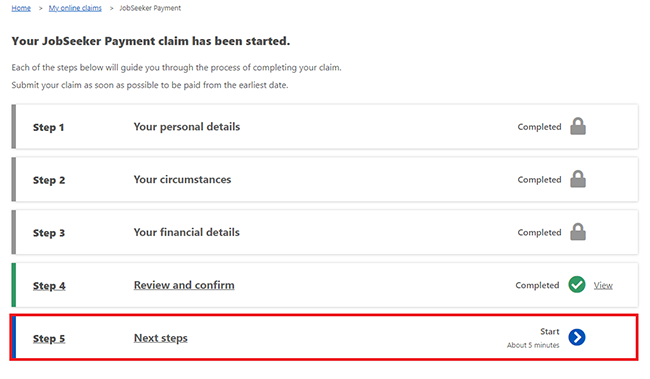
Select Begin if you don’t have tasks to complete. To submit your claim, go to Step 7.
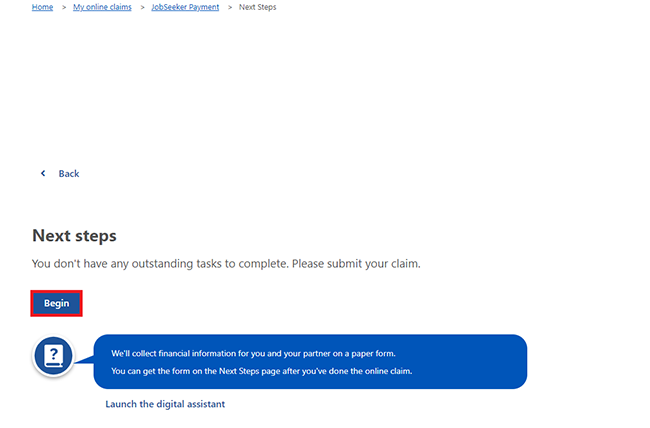
Or select Begin if you need to complete extra tasks for your claim.
The tasks will show as either Required or Supplementary.
If a task is Required you must complete it before you can submit your claim.
If the task is Supplementary, you don’t need to give us these documents with your claim. But, if you do, it’ll help us work out if you’re entitled to other payments and services.
Depending on your situation, we’ll let you know if you can submit your claim before completing all Required tasks.
Select Upload for the task you need to complete. You’ll need to do this for each Required task and each Supplementary task you choose to complete. Read more about how to Upload documents with your Centrelink online account or the Express Plus Centrelink mobile app.
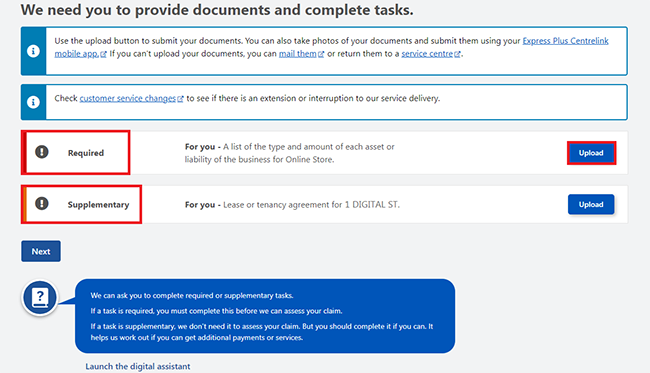
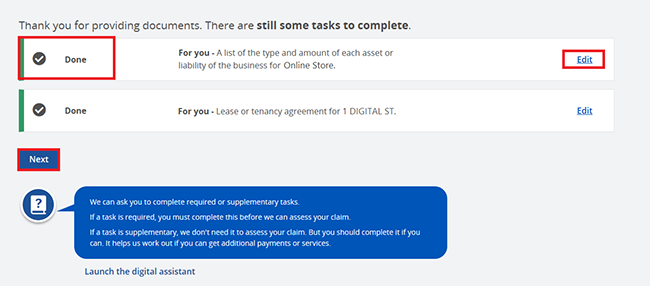
When you’ve completed the task, the status changes from Required or Supplementary to Done.
If you’ve completed a task and you need to change it, select Edit.
When you’ve completed all required tasks, select Next.
If you need to give us documents to confirm your identity, we’ll tell you this is a Required task. Read more about how you can confirm your identity.
Another Required task may appear after you confirm your identity. This’ll be to book an appointment.
If no more Required tasks appear, go to Step 7 to submit your claim.
Select Book to make your appointment.
Select Begin to continue.
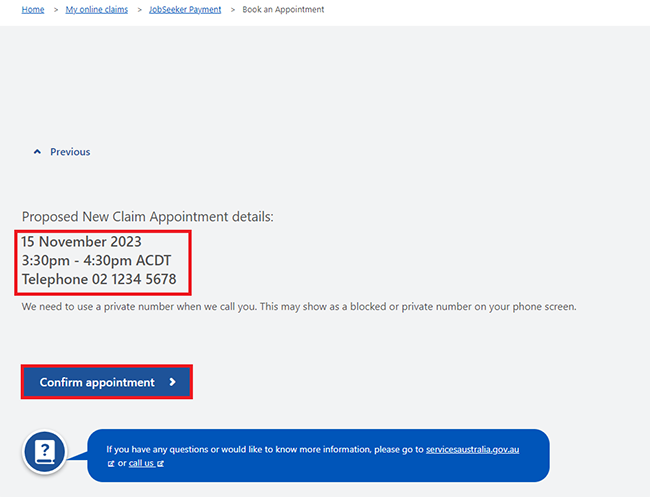
Answer the questions and use the dropdown menus to choose your appointment date, time and preferred phone number.
We’ll ask you to confirm your appointment details. To do this, select Confirm appointment.
Select Next to submit your claim.
Step 7: submit your claim
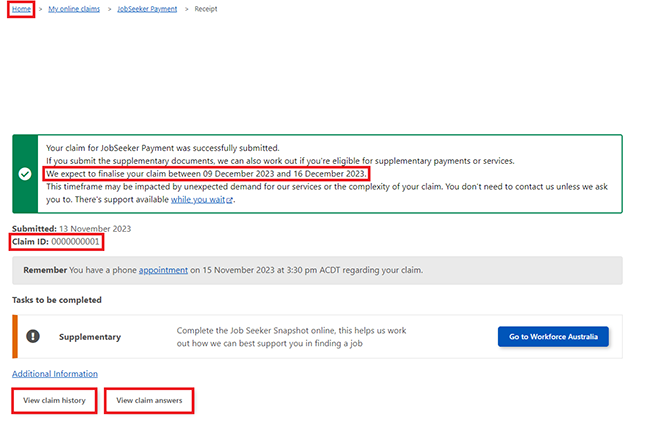
If you’ve completed all required tasks and you’re ready to submit your claim, select Submit.

We’ll let you know if you’ve successfully submitted your claim.
We’ll give you an estimated completion date range of when we’ll process your claim.
You can track the progress of your claim from your homepage. To check what stage your claim is at, select View. Go to claim outcome for steps on how to check the progress of your claim.
Use your Claim ID if you need to talk to us about your claim. You can do this by calling us on your regular payment line or visiting a service centre.
You can select any of these:
- Home to go back to your homepage
- View claim history to see the history of your claim, including any documents or tasks you’ve completed
- View claim answers to see the information you gave us.
Claim outcome
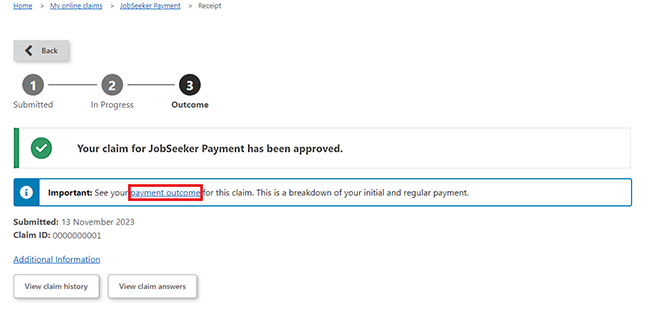
Select View claim to check the progress of your claim.

Select payment outcome to view the result of your claim if either:
- you’ve claimed JobSeeker Payment
- your claim is processed and approved, not rejected.
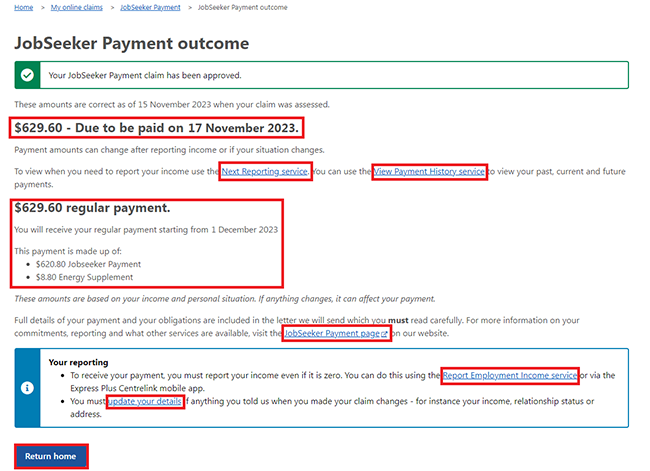
The JobSeeker Payment outcome page shows all of these:
- the amount and date you’ll be paid
- your regular payment amount and a breakdown of it.
You can select any of these:
- Next Reporting service to view your future reporting periods
- View Payment History service to view your previous and future payments
- JobSeeker Payment page to view information about your obligations
- Report Employment Income service to report your paid income
- update your details if your information has changed since submitting your claim
- Return home to go back to your homepage.
Step 8: sign out
From your homepage, you can complete other transactions or select Return to myGov to go back to your myGov account.
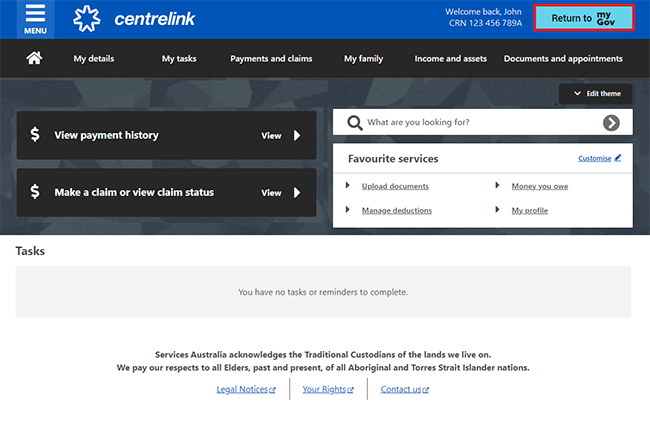
For your privacy and security, sign out when you’ve finished using your myGov account.
View other online account and Express Plus mobile app guides and video demonstrations about using your online account.