in this guide
Employment income affects your payment from us. To make sure we’re paying you the right amount, we need you to report your and your partner’s gross employment income.
You can report your income in English, Arabic, Chinese, Persian (Farsi) or Vietnamese. To do this, change the language setting on your device. You need to do this before you open the app. To get help, go to your device manufacturer’s website.
Gross income is the amount your employer pays you before tax and other deductions. You must report the gross income your employer paid you, and gross income your partner’s employer paid them, in your reporting period. You can find your gross pay amount on your payslip.
If you’re on:
- scheduled reporting, you need to submit your report on or after your reporting date so we can check your regular payment is correct
- unscheduled reporting, you need to tell us about any income you’re paid within 14 days of being paid by your employer.
To make sure you get paid on time, you must submit your report by 5 pm local time on your reporting date. Read more about employment income reporting.
There may be other tasks or activities you need to do to keep getting your payment. This depends on the payment you get. Read more about mutual obligation requirements.
You may have to report in a different way based on your personal circumstances. Some steps in this guide may not apply to you.
Some employers use Single Touch Payroll (STP). This means they send your information to us and the Australian Taxation Office (ATO) automatically. We use it to pre-fill information in your employment income report. You can review the information before you continue and then complete your report. You may need to change or add details so your report is complete and correct. The information we have depends on how your employer does their payroll reporting. After you review and submit the information, it’ll pre-fill into your employment income report. If you have a partner, we won’t pre-fill their information for you to review.
The screenshots in this guide are from an Apple iOS device. Some screens may look different if you’re using an Android device.
Step 1: get started
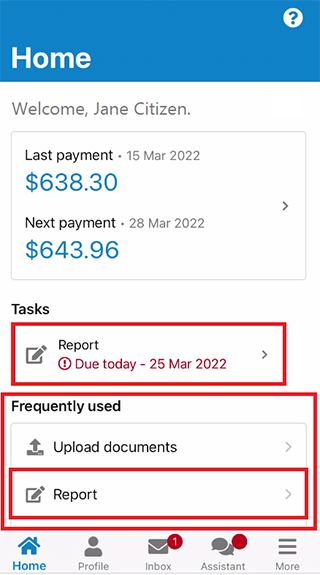
If you’re subscribed to notifications and you’re required to report, you may get an alert on your device to let you know when you’re due to report. Select the alert and sign in to the app to go to the Report employment income service.

If you aren’t subscribed to notifications, select Report from Tasks or Frequently used on your home screen.
In this example, we’ll select Report from Frequently used.
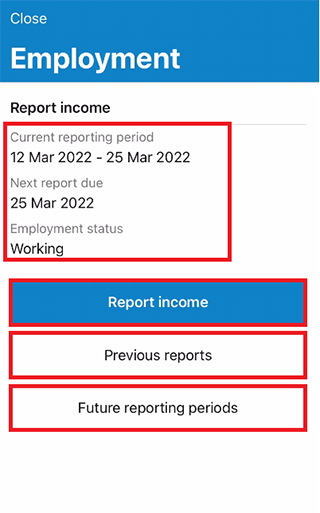
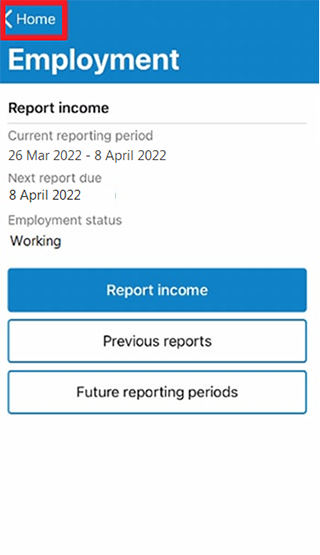
The Employment screen will show your:
- current reporting period
- next report due date
- employment status.
You can select any of the following:
- Report income to begin your report, update or add new employment income details
- Previous reports to view or update up to 6 of your past reporting periods. This doesn’t include Single Touch Payroll employers
- Future reporting periods to view up to 6 of your future reporting periods.
Step 2: confirming pre-filled employment details from your employer
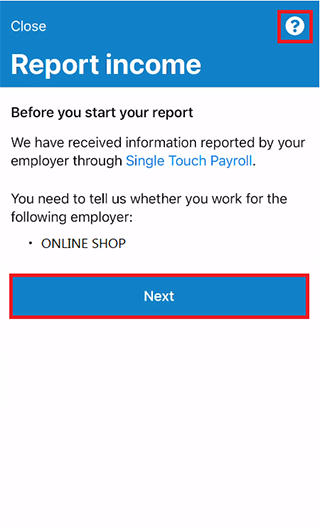
A Before you report message will tell you there’s pre-filled employment information to check, if employment details are available from your employer.
If we don’t show pre-filled information, go to Step 3.
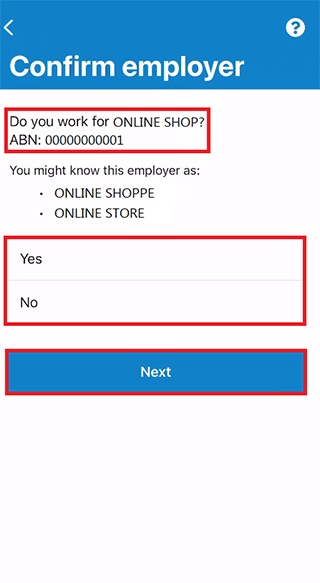
When your employer gives us your details for the first time, we’ll show your employer’s name and Australian Business Number (ABN) or Withholding Payer Number (WPN). You must confirm if you work for them. We won’t pre-fill your employment income until your next report.
Employers may have a different trading name to their registered business name. If you don’t recognise the employer name, we’ll show different business or trading names of the employer.
If you have more than one Single Touch Payroll employer, you’ll need to confirm the pre-filled information for each employer, one at a time. We won’t pre-fill your partner’s employer details.
If you need help, select the question mark icon.
On your next reporting date, we’ll tell you we’ve got information from your employer. Select Next.
We’ll show your employer’s name and Australian Business Number (ABN) and ask if you work for them.
Select either:
- Yes if you work for the employer shown
- No if you don’t work for the employer shown.
Then select Next.
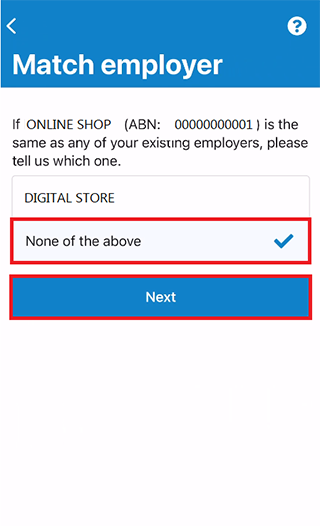
If you’ve already told us about your employer, select them from the list. We can then match the employer on your record.
If they’re not in the list, select None of the above and enter the name you want us to record your employer as.
Then select Next.
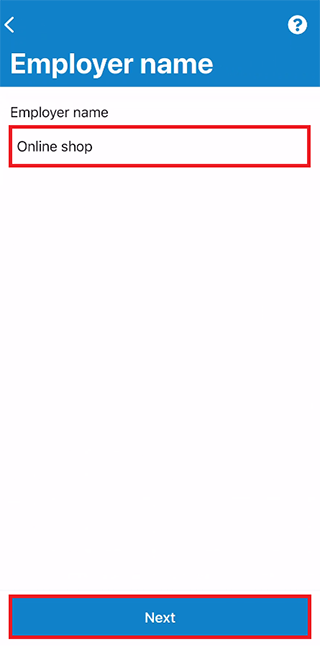
Enter your employer’s name, then select Next.
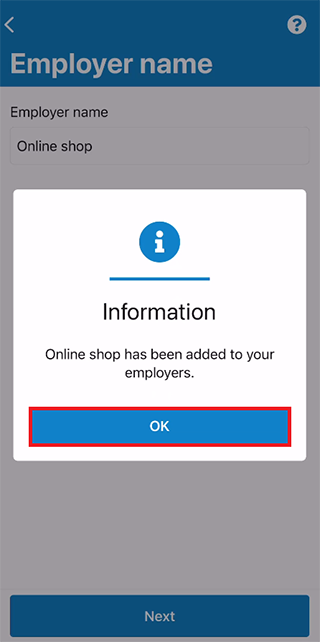
We’ll let you know we’ve added your employer. Select OK.
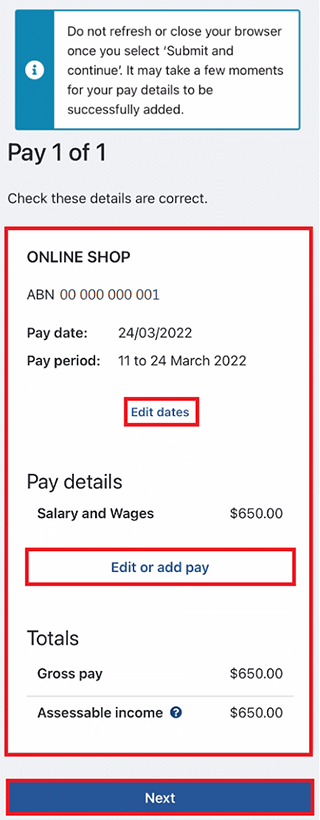
We’ll show the following pay details:
- Pay date
- Pay period
- Pay details, for example, salary and wages, and paid leave
- Gross pay, this is the amount before tax and any other deductions
- Assessable income
- Non-assessable income, if applicable.
Check your payslip if you’re unsure about the pre-filled details shown.
If any details are wrong or not pre-filled, you’ll have to make changes. Select either:
- Edit dates to make changes to the pay period, you won’t be able to change the pay date
- Edit or add pay to make changes to the pre-filled income details or to add pay for this employer.
If you make changes, we may ask you to give us proof.
If you were paid more than once by this employer in the reporting period, we’ll show the pay details one at a time for you to review.
Select Next to continue.
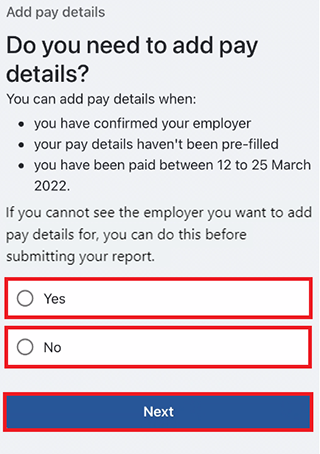
Select Yes or No to tell us if you need to add pay details for this employer.
If you select Yes, you can only add pay details for the Single Touch Payroll employer you’re currently editing. You can add any pay type that hasn’t been pre-filled if you were paid within the reporting period. This includes all income, such as bonuses, commission income and termination payments you got from your Single Touch Payroll employer.
Then select Next.
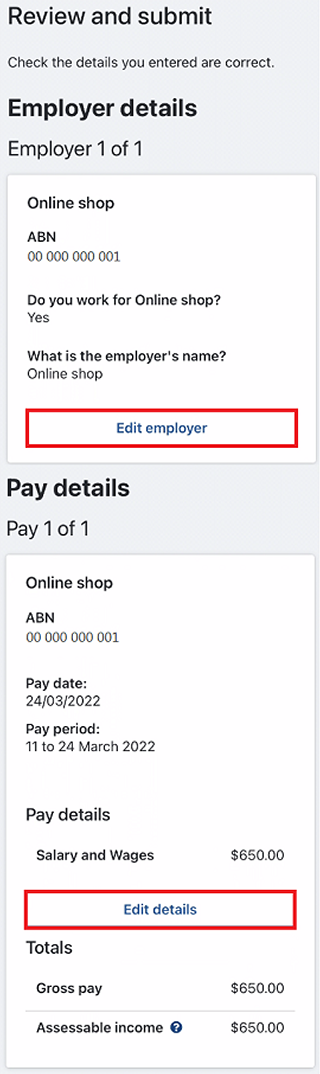
We’ll show you a summary of your pre-filled employer and pay details. Review each section to check all the details are correct.
If you manually added pay details, you’ll have the option to delete pay. You can add them again if you entered them wrong.
If you need to make changes, select either:
- Edit employer to make changes to your employer
- Edit details to make changes to your pay.
If you make changes, we may ask you to give us proof.
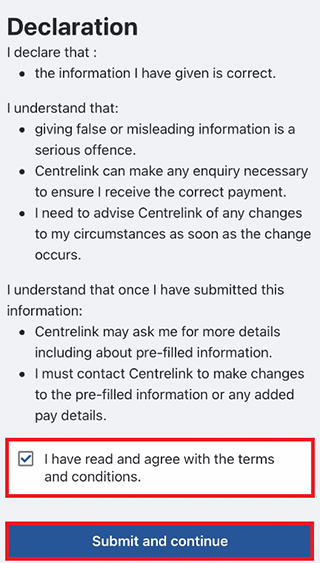
Move down the screen and read the declaration. If you understand and agree with the declaration, select I have read and agree with the terms and conditions. Then select Submit and continue.
When you select Submit and continue, you’re only confirming the Single Touch Payroll employment details. You won’t be able to change these details after you submit them. After you submit, you must complete the rest of your report.
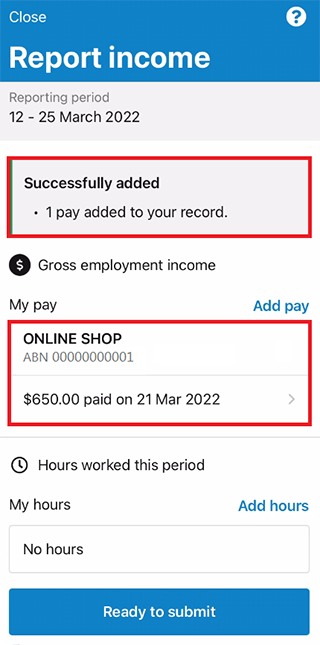
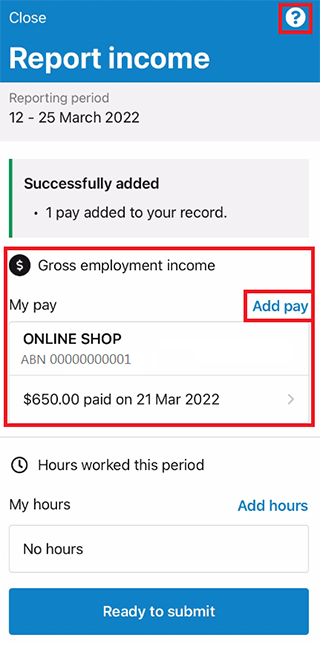
We’ll let you know all of the following:
- your gross pay was successfully added to your record
- your employer’s details
- the amount and date of your gross pay.
We won’t show any not assessable income you told us about earlier on this screen. Income that is not assessable isn’t used to work out your rate of payment or entitlement.
Go to Step 3 to continue your report.
Step 3: report zero or non-pre-filled employment income
You can’t enter some employment income types, such as bonuses, commission income or termination payments for non-Single Touch Payroll employers. To tell us about other paid employment income, use the Manage income and assets service.
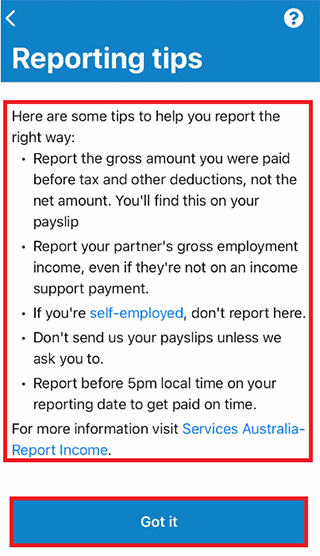
We may show some Reporting tips to help you report the right way. If you get this message, please read it, then select Got it to continue.
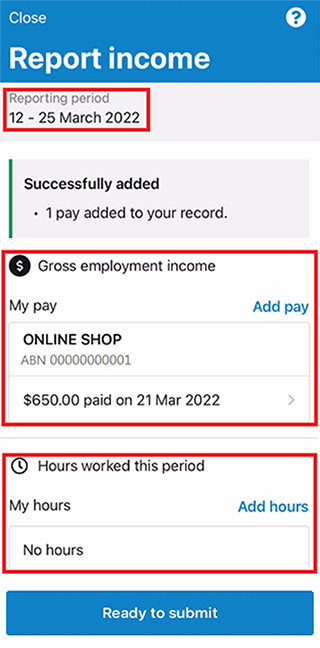
The Report income screen will show all of the following:
- any Single Touch Payroll income details you confirmed
- your reporting period
- a Gross employment income section
- Hours worked this period section.
If you’re on:
- scheduled reporting, submit your report on the date it’s due
- unscheduled reporting, you can use this service any time to let us know what you’ve been paid. You need to do this within 14 days of being paid.
Learn how to report the following in your reporting period:
Report zero employment income for you or your partner
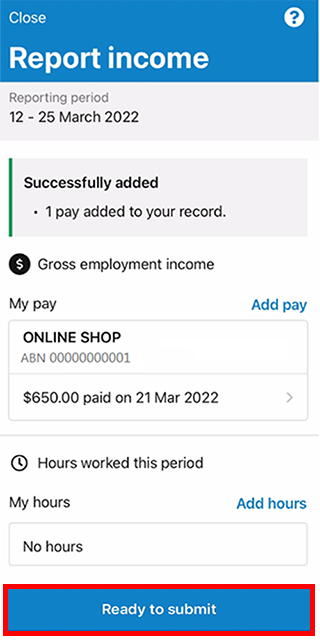
If you and your partner didn’t get paid any other employment income in your reporting period, select Ready to submit.
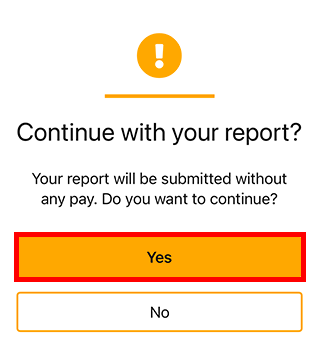
A Continue with your report message may appear. This is a prompt for you to check that everything you need to tell us is included.
If you don’t need to include anything else, select Yes to continue.
If you have a Job Plan, go to Step 4 to report your requirements.
If you don’t have a Job Plan, go to Step 5 to review and submit your information, and then complete your report.
Report other employment income for you and your partner
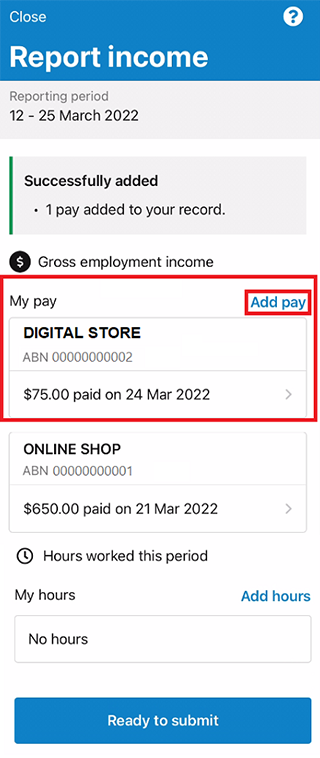
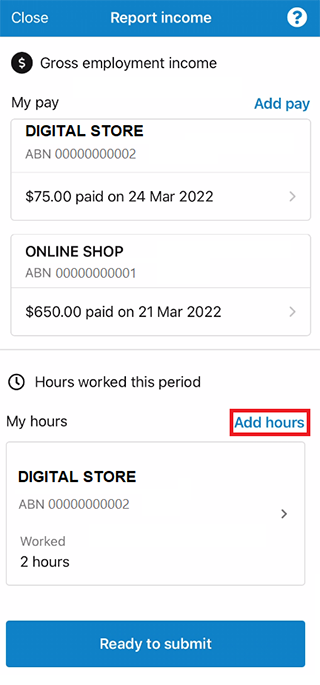
If you do have other employment income to report, select Add pay in Gross employment income.
You need to include all of the following:
- any gross income you were paid in the reporting period
- any gross income your partner was paid in the reporting period
- any gross income your employer back paid you or your partner
- the hours both you and your partner worked, if required.
You may not need to report the hours worked. This depends on the payment type you and your partner get. If you don’t need to report hours worked, the Add hours option won’t show.
If you’re waiting for back pay, don’t report this as income until you get it.
If you need help, select the question mark icon.
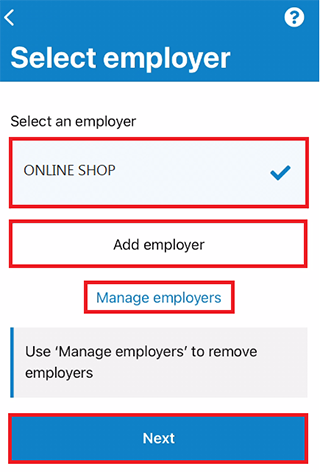
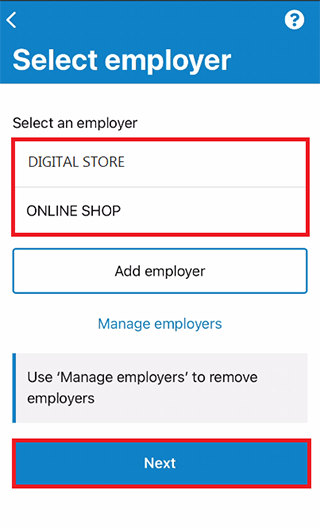
You can select one of the following:
- your employer from the list, then select Next to add your pay
- Add employer if your employer doesn’t appear on the list
- Manage employers to remove an employer.
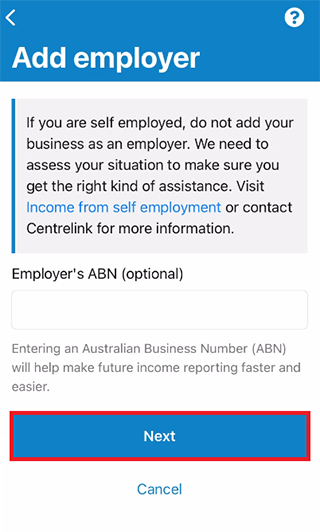
Add employer
You can add a new employer for you or your partner.
Enter your Employer’s ABN (Australian Business Number). You can find this on your payslip.
Then select Next.
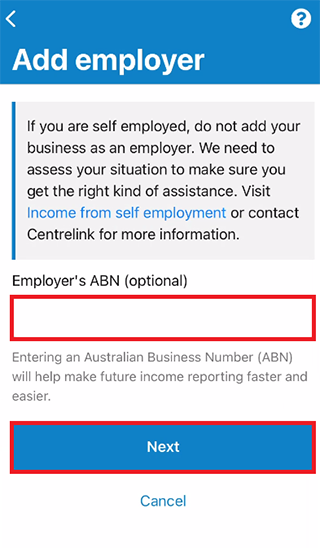
If you can’t find your employer’s ABN, leave this field blank and select Next.
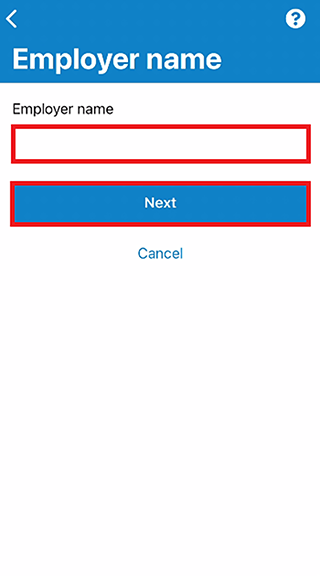
Enter your Employer name, then select Next.
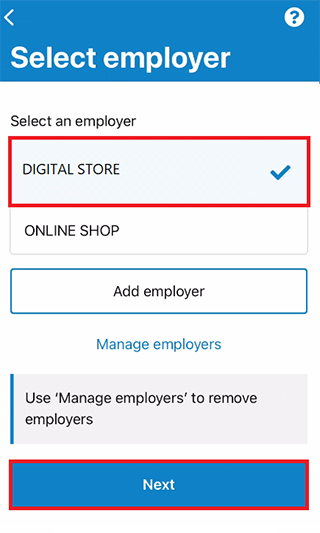
Your new employer will appear on the Select employer screen. Select the new employer, then Next to continue.
In this example, the employer’s name is Digital Store.
Add pay
If you need help, select the question mark icon on each screen.
In this reporting period, if you or your partner got paid more than once by the same employer, you’ll need to add each pay separately. If you have more than one job, you’ll need to add the income you got from each employer separately.
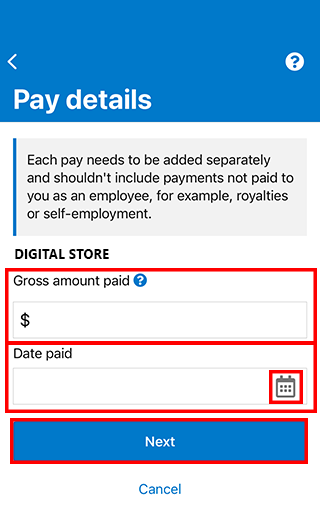
Enter the Gross amount paid, before tax and deductions. You can find this on your payslip. Use Australian dollars and cents, including the decimal point.
Select the calendar icon and choose the date your employer paid you, as stated on your payslip. This date can be different to when the payment goes in your bank account.
Then select Next.
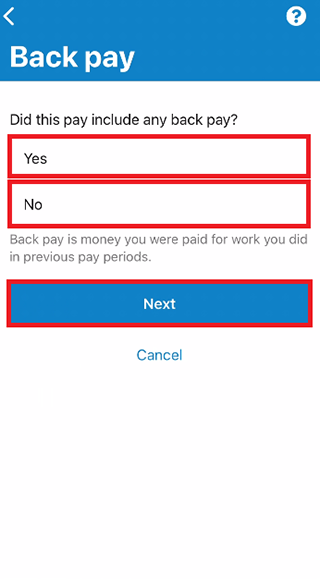
Select Yes or No to tell us if this pay includes any back pay.
Then select Next.
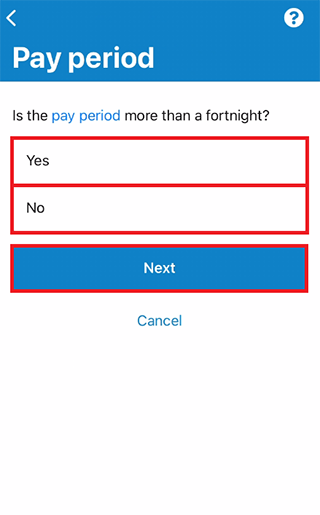
Select Yes or No to tell us if this pay period is longer than a fortnight.
Then select Next.
We’ll give you a summary of the details you added.
Your total income for each employer will show in Gross employment income under My pay.
If you’ve reported your partner’s income, that will be under My partner’s pay. Select Add pay if you:
- have more than one job, to enter income from a different employer for you or your partner
- got paid more than once by the same employer.
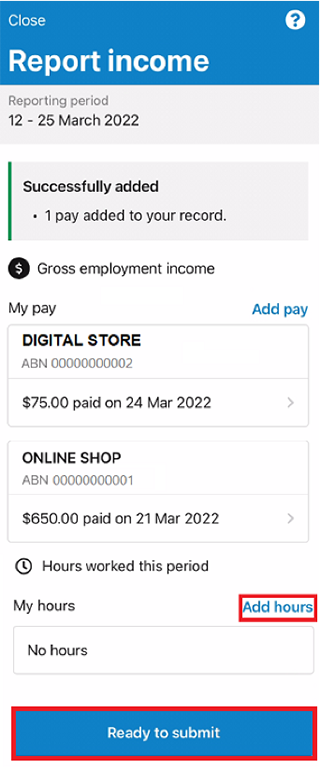
Select Add hours if you need to tell us the hours you and your partner worked for each employer during your reporting period.
You may not need to report the hours worked. This depends on the payment type you and your partner get. If you don’t need to report hours worked, the Add hours option won’t show and you can select Ready to submit to proceed.
Choose your employer from the list, then select Next.
Enter the total Hours you worked during the reporting period, to the nearest hour. For example, if you worked 2.5 hours, enter 3. This can be different to the hours recorded on your payslip.
Then select Next.

If you or your partner worked for more than one employer, select Add hours to enter hours for other employers.
Review each section to make sure it’s correct.
If you have a Job Plan, go to Step 4 to report your requirements.
If you don’t have a Job Plan, go to Step 5 to review and submit your information, and then complete your report.
Step 4: update Job Plan requirements
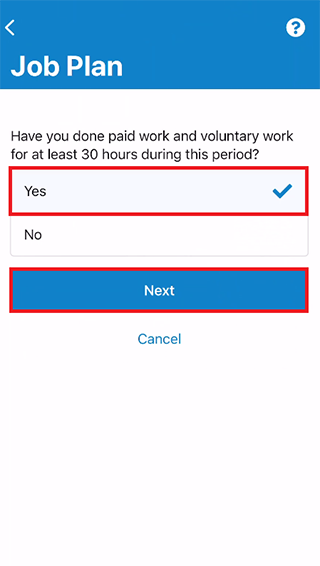
If you’re a job seeker managed by Centrelink, we’ll ask if you’ve met your Job Plan requirements for the reporting period. The question asked will be specific to the activity you’re participating in.
Select Yes or No to tell us if you met your Job Plan requirements.
Then select Next.
If you’ve met your Job Plan requirements, go to Step 5 to review and submit the information you’ve given us.
If you haven’t met your Job Plan requirements, select No, then Next.
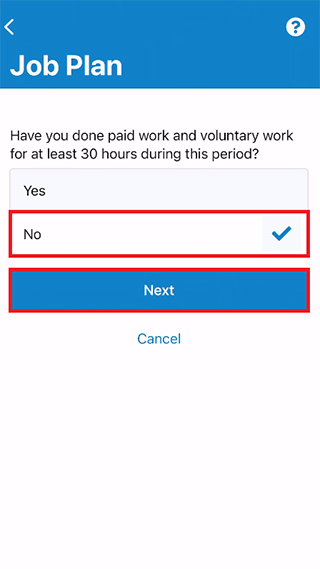
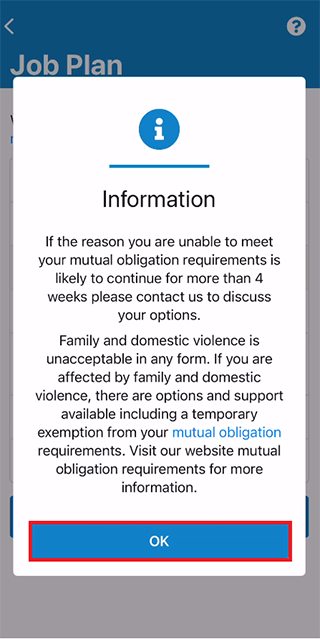
If you haven’t met your mutual obligation requirements this reporting period, you may need to let us know the reason.
Select the reason, then Next.
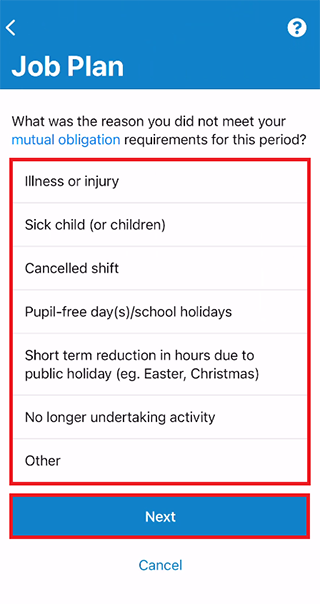
Read the information about mutual obligation requirements, then select OK. Go to Step 6.
Step 5: review and submit your update
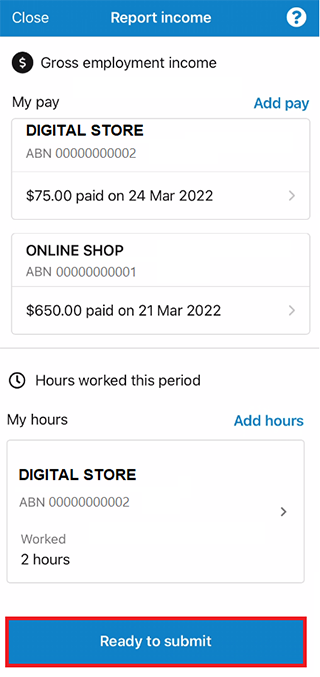
Review your information, including employment income, making sure it is correct and only shows once. If your details are correct, select Ready to submit.
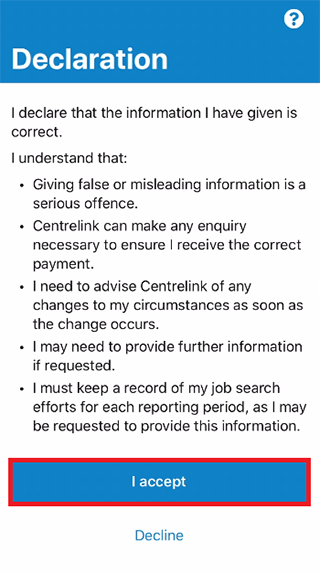
Read the declaration. If you understand and agree with the declaration, select I accept.
Get your receipt
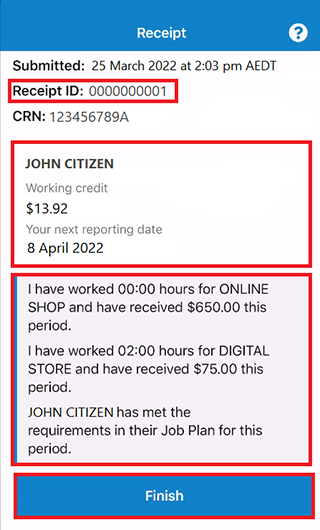
We’ll give you a receipt when you submit your report.
Select View payment history to check your next payment details. Payment amounts of zero won’t show in the View payment history service.
If you need to make changes to the income you reported, select Update report.
If your update failed to submit or there’s action required, go to Step 6.
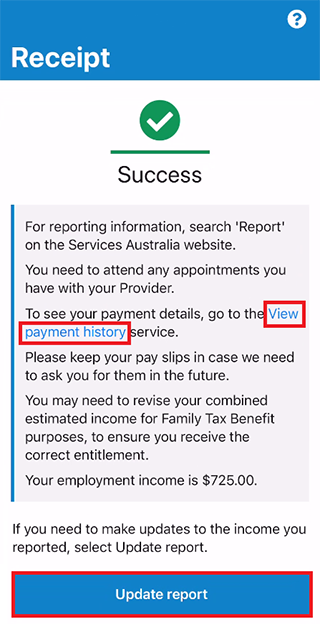
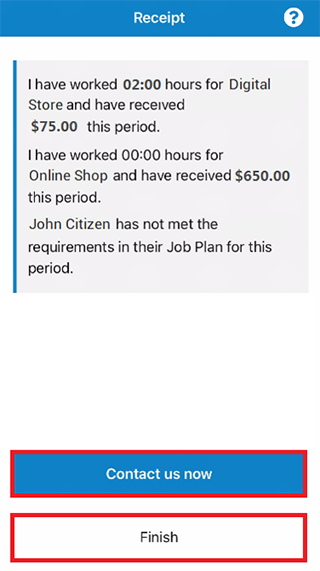
Move down the screen to view more receipt details. Make a note of the Receipt ID for your records.
Your receipt will include the following:
- your Working Credit, Work Bonus or Income Bank balance
- your next reporting date
- a summary of your report details
- information you need to know based on your circumstances
- your next payment amount if it’s zero.
Your receipt may also show your partner’s:
- Working Credit, Work Bonus or Income Bank balance
- next payment amount if it’s zero.
These details will show if they get a payment, and they permit you to access their information.
Select Finish to go back to the Employment screen.
Select Home to go back to your home screen, then go to Step 7 to sign out.
Step 6: failed to submit or action required
We’ll tell you if your update failed to submit or there’s action required to complete your report.
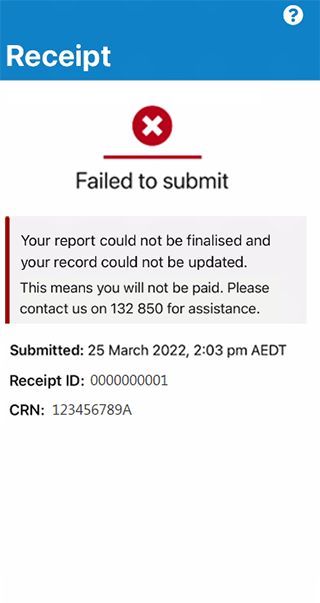
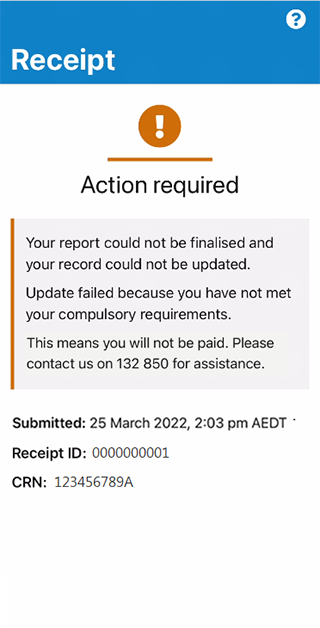
Move down the screen, then select Contact us now if you’re reporting within business hours.
If there’s no Contact us now option or you’re reporting outside of business hours, select Finish and go to Step 7 to sign out. You’ll need to exit the app and phone us to complete your report.
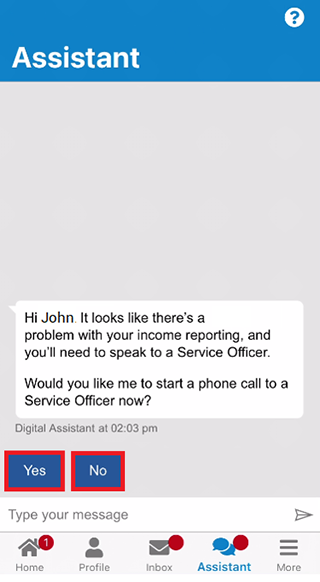
The Digital Assistant asks if you want to speak to a Service Officer.
You can select either:
- Yes, to speak to a Service Officer from your mobile device while you’re in the app.
- No, to phone us at another time to complete your report.
Go to Step 7 to sign out.
Step 7: sign out
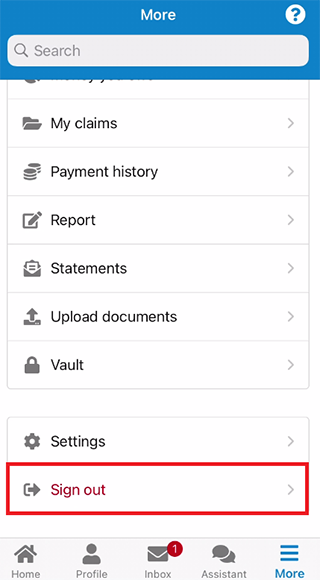
For your privacy and security, sign out when you’ve finished using the app.
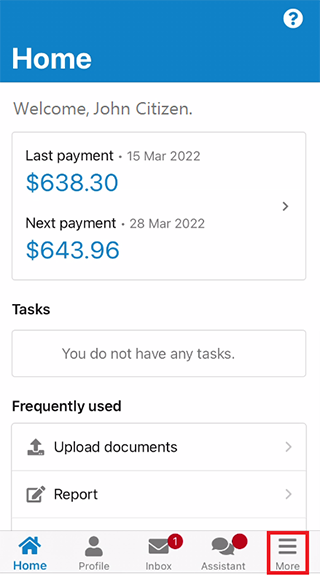
To sign out, select More.
Then select Sign out.
View other online account and Express Plus mobile app guides and video demonstrations about using your online account.